Power washing is an effective way to clean and rejuvenate outdoor surfaces, including wooden decks, fences, and siding. However, wood is a delicate material that requires careful handling to avoid damage such as splintering, warping, or stripping its natural finish. When done correctly, power washing can remove dirt, grime, mold, and mildew from wooden surfaces while preserving their integrity and beauty. This comprehensive guide will walk you through the steps to safely power wash wooden surfaces, offering expert tips to ensure optimal results without compromising the material.
Understanding the Basics of Power Washing Wooden Surfaces
Before diving into the process, it’s essential to understand why wood requires special attention during power washing. Unlike concrete or brick, wood is porous and susceptible to water infiltration, which can lead to swelling, cracking, or rot if not managed properly. Additionally, excessive pressure can gouge the surface, raise the grain, or strip protective sealants, leaving the wood vulnerable to weathering. The key to success lies in balancing the cleaning power of the pressure washer with techniques that protect the wood’s structure and finish.
Power washers come with adjustable pressure settings, typically measured in PSI (pounds per square inch), and various nozzle tips that control the spray pattern. For wooden surfaces, using the right combination of pressure and technique is critical. This article will cover everything from preparation to post-washing care, ensuring your wooden surfaces look pristine without sustaining damage.

Step 1: Assess the Condition of the Wood
The first step in power washing wooden surfaces is to evaluate their condition. Not all wood is the same—age, type, and prior treatments play a significant role in determining how to proceed. For example, older wooden decks may have weakened fibers or loose boards, while freshly treated lumber might still have a protective sealant intact. Inspect the surface for signs of rot, splintering, or mildew growth, as these factors will influence your approach.
If the wood is painted or stained, determine whether the coating is intact or peeling. Power washing can strip paint or stain if the pressure is too high, so you’ll need to decide whether your goal is to clean the surface or prepare it for refinishing. For heavily damaged wood, consider consulting a professional before proceeding, as power washing could exacerbate existing issues.
Take note of any nails, screws, or metal fixtures protruding from the surface. These should be secured or removed to prevent injury or damage to the power washer. By thoroughly assessing the wood, you’ll be better equipped to choose the appropriate tools and techniques for the job.
Step 2: Choose the Right Power Washer and Settings
Selecting the correct power washer is crucial for safely cleaning wooden surfaces. For most residential wood cleaning projects, a pressure washer with a PSI range of 1,200 to 1,500 is ideal. This level of pressure is strong enough to remove dirt and grime but gentle enough to avoid damaging the wood. Gas-powered washers typically offer higher PSI, while electric models are more suitable for lighter tasks like wooden surfaces.
Next, choose the appropriate nozzle tip. Power washers come with interchangeable tips, usually color-coded to indicate the spray angle. For wood, opt for a wide-angle nozzle, such as a 25-degree (green) or 40-degree (white) tip. These provide a broader, less concentrated spray that minimizes the risk of gouging or splintering. Avoid using a 0-degree (red) or 15-degree (yellow) nozzle, as their narrow, high-pressure streams are too aggressive for wood.
Test your settings on a small, inconspicuous area of the wood before tackling the entire surface. Adjust the PSI or nozzle if you notice any adverse effects, such as raised grain or water penetration. This trial run ensures you’ve dialed in the perfect setup for your specific wooden surface.
Step 3: Prepare the Area and the Wood
Proper preparation is a critical step that many overlook, yet it can make or break your power washing project. Start by clearing the area around the wooden surface. Remove furniture, planters, or decorations to create a safe working space and prevent accidental damage. Sweep the wood with a broom to dislodge loose dirt, leaves, or debris, which reduces the workload for the power washer.
Protect nearby plants, windows, or delicate surfaces by covering them with plastic sheeting or tarps. Water from the power washer can carry cleaning solutions or debris, potentially harming vegetation or soaking unintended areas. If the wood is part of a structure like a house or shed, ensure windows and doors are closed to prevent water intrusion.
For added protection, dampen the wooden surface with a garden hose before power washing. Pre-wetting the wood helps it absorb less water during the process, reducing the risk of swelling or warping. If the surface has mold, mildew, or stubborn stains, apply a wood-safe cleaning solution (such as a mixture of water and mild detergent or a specialized deck cleaner) and let it sit for 10-15 minutes. Always follow the manufacturer’s instructions for any cleaning product to avoid damaging the wood.
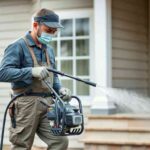
Step 4: Master the Power Washing Technique
Technique is everything when power washing wooden surfaces. Hold the wand at a 30- to 45-degree angle to the wood and maintain a consistent distance of 6 to 12 inches from the surface. This angle allows the water to clean effectively without driving it too deeply into the wood’s pores. Start with a lower pressure setting and gradually increase it if needed, keeping an eye on the wood’s response.
Work in small sections, moving the wand in the direction of the wood grain. This prevents cross-grain scratches and ensures a uniform clean. Avoid lingering too long in one spot, as prolonged exposure to high-pressure water can erode the surface or raise the grain, leaving it rough and uneven. Use smooth, sweeping motions to cover the area evenly.
If you’re cleaning a large surface like a deck, divide it into manageable zones to maintain control and consistency. Rinse off any cleaning solution thoroughly with a low-pressure spray to prevent residue buildup. Patience is key—rushing the process increases the likelihood of damage.
Step 5: Rinse and Inspect the Wood
After power washing, rinse the entire surface with clean water using a low-pressure setting or a garden hose. This step removes any remaining dirt, debris, or cleaning solution that could dry onto the wood and cause discoloration. Pay special attention to crevices or joints where water and residue might collect.
Once rinsed, inspect the wood closely. Look for signs of damage, such as splintering, raised grain, or excessive moisture retention. If the surface feels rough to the touch, you may need to sand it lightly after it dries to restore smoothness. Allow the wood to air dry completely, which can take 24 to 48 hours depending on weather conditions. Avoid direct sunlight during drying if possible, as rapid drying can cause cracking or warping.
Step 6: Post-Washing Care and Maintenance
Power washing is only part of the equation—proper aftercare ensures the wood remains in good condition. Once the surface is dry, consider applying a protective sealant or stain to shield it from moisture, UV rays, and future dirt buildup. Choose a product specifically designed for your type of wood (e.g., cedar, pine, or pressure-treated lumber) and follow the application instructions carefully.
For decks or outdoor furniture, regular maintenance is essential. Sweep the surface weekly to prevent debris accumulation, and clean spills promptly to avoid staining. Reapply sealant every one to two years, or as recommended by the product manufacturer, to keep the wood protected.
If you notice any minor damage post-washing, such as small splinters or uneven patches, address it promptly with sandpaper or wood filler. Taking these proactive steps extends the life of your wooden surfaces and keeps them looking their best.

Common Mistakes to Avoid
To achieve a damage-free power washing experience, steer clear of these frequent pitfalls:
-
- Using Excessive Pressure: High PSI settings can gouge or splinter wood. Stick to the recommended range for safety.
-
- Skipping Preparation: Failing to clear the area or pre-wet the wood increases the risk of poor results or damage.
-
- Ignoring the Grain: Washing against the grain can leave visible marks and roughen the surface.
-
- Over-Wetting: Too much water can penetrate the wood, leading to swelling or rot. Use moderate pressure and rinse efficiently.
Conclusion
Power washing wooden surfaces can transform their appearance, making them look fresh and vibrant without the need for costly replacements. By assessing the wood’s condition, selecting the right equipment, preparing thoroughly, and using proper techniques, you can achieve professional-quality results while avoiding damage. Post-washing care, such as sealing and regular maintenance, ensures your wooden surfaces remain durable and attractive for years to come.
With this detailed guide, you’re equipped to tackle your next power washing project with confidence. Whether it’s a deck, fence, or siding, the right approach will preserve the natural beauty of the wood while effectively removing dirt and grime. Take your time, follow these steps, and enjoy a clean, damage-free wooden surface that enhances your outdoor space.