Stubborn stains on outdoor surfaces—whether oil on driveways, algae on decks, or graffiti on walls—can detract from a property’s appearance and even cause long-term damage if untreated. Power washing, also known as pressure washing, is a highly effective method for tackling these tough blemishes, using high-pressure water combined with specialized detergents to restore surfaces to their original condition. When executed correctly, power washing delivers professional-grade results, enhancing curb appeal and preserving materials. This article provides a detailed guide on how to remove stubborn stains using power washing methods, offering professional insights and step-by-step instructions to ensure success.
Understanding Stubborn Stains and Power Washing’s Advantage
Stubborn stains, such as oil, grease, algae, mildew, rust, and graffiti, are challenging because they bond chemically or physically to surfaces, resisting simple scrubbing or hosing. Oil penetrates porous concrete, algae embed roots in wood, and graffiti adheres to brick, making them tough to lift without the right approach. Power washing excels here, delivering water at 1,200-3,000 PSI (pounds per square inch) to dislodge debris while detergents break down the stain’s molecular structure.
The advantage lies in its efficiency and depth—unlike manual methods, power washing reaches into pores and crevices, ensuring a thorough clean. Hot water and targeted cleaners further enhance results, especially for organic or oily stains. However, success requires understanding the stain type, surface material, and proper technique to avoid damage. Let’s explore the comprehensive process for removing stubborn stains with power washing.

Step 1: Identify the Stain and Surface Type
Effective stain removal begins with identifying the stain and the surface it’s on, as this determines the power washing method, pressure, and detergent needed. Misjudging this step can lead to incomplete cleaning or surface damage, such as etching concrete or splintering wood.
Common stains include:
- Oil/Grease: Dark, glossy patches on driveways or patios, often from vehicles.
- Algae/Mildew: Green or black films on decks, siding, or walkways, thriving in damp areas.
- Rust: Reddish-brown marks on concrete or metal, from oxidized iron.
- Graffiti: Spray paint or ink on walls, fences, or brick.
- Gum: Sticky residues on sidewalks, hardened by time.
Surface types—concrete, wood, brick, vinyl siding, or asphalt—have unique tolerances. Concrete withstands 2,500-3,000 PSI, while wood or vinyl requires 1,200-1,500 PSI to avoid harm. Inspect the stain’s age and depth—fresh oil is easier to lift than oxidized stains—and check the surface for cracks or wear that might limit pressure use. This assessment guides equipment selection (e.g., gas vs. electric washer) and ensures a tailored approach, maximizing stain removal while protecting the material.
Step 2: Gather Essential Power Washing Equipment
Having the right equipment and supplies is critical for tackling stubborn stains efficiently and safely. A well-prepared setup prevents delays and ensures professional results, minimizing the risk of surface damage or ineffective cleaning.
Choose a power washer suited to the task: gas-powered units (2,500-3,000 PSI) are ideal for tough stains like oil or graffiti, while electric models (1,200-2,000 PSI) work for lighter stains or delicate surfaces. Select nozzles—15-degree (yellow) for targeted stain removal, 25-degree (green) for general cleaning, or 40-degree (white) for rinsing fragile materials. Avoid 0-degree tips, which can gouge surfaces.
Stock detergents based on stain type: a degreaser (e.g., Krud Kutter Oil Grabber) for oil, a biocide (e.g., Wet & Forget) for algae/mildew, a rust remover (e.g., CLR) for rust, or a graffiti cleaner (e.g., Tagaway) for paint. Include a stiff-bristle brush for pre-scrubbing, tarps for runoff containment, and safety gear—goggles, gloves, and non-slip boots—to protect against spray or debris. Ensure a steady water supply (¾-inch hose, 2-5 GPM). This arsenal equips you to handle any stain with precision and care.
Step 3: Prepare the Area and Surface
Proper preparation safeguards the surrounding environment and optimizes stain removal. Without it, runoff can harm plants, water can enter structures, or debris can complicate cleaning, undermining your efforts.
Clear the surface of loose dirt, leaves, or debris using a broom or leaf blower—exposing the stain fully aids detergent penetration. Cover nearby plants, grass, or landscaping with tarps or plastic sheeting, wetting them first to dilute any chemical overspray. In urban areas, shield storm drains with barriers to comply with runoff regulations, preventing oil or paint from polluting waterways.
Protect adjacent structures—tape plastic over windows, doors, or electrical outlets to block water intrusion. For elevated surfaces like walls, secure ladders and wear non-slip shoes. Work in favorable weather—avoid wind that scatters spray, and ensure drying time post-wash (24-48 hours). Preparation creates a controlled workspace, enhancing safety and focusing power washing on the stain itself.
Step 4: Pre-Treat Stains with Detergent
Pre-treating with a targeted detergent is essential for breaking down stubborn stains, as water pressure alone often fails against oil, algae, or paint. This step loosens the stain’s grip, making power washing more effective and reducing the need for excessive pressure.
Apply the appropriate cleaner: spread a degreaser over oil stains, a biocide on algae/mildew, a rust remover on oxidized marks, or a graffiti solvent on paint. Use a pump sprayer or low-pressure setting (1,200 PSI) for even coverage, ensuring the entire stain is coated. For oil or gum, work the detergent in with a stiff-bristle brush to penetrate pores; for algae, let it soak into the surface.
Allow dwell time—10-20 minutes for most stains, longer (30 minutes) for graffiti or rust—keeping the area wet by misting if it dries. Hot water (up to 200°F) boosts degreasing for oil or grease. Pre-treatment is critical: it emulsifies or kills stains, ensuring the power washer can flush them away completely, leaving no residue or spores.
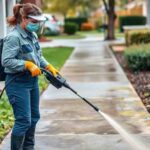
Step 5: Power Wash with Precision Technique
Power washing the stain requires careful technique to lift it without damaging the surface. Incorrect pressure, distance, or angle can etch concrete, splinter wood, or strip paint, so precision is paramount.
Start with a test area at 1,500 PSI using a 15-degree nozzle for tough stains (oil, graffiti) or a 25-degree for organic ones (algae, mildew). Adjust based on surface: 2,500-3,000 PSI for concrete, 1,200-1,500 PSI for wood or siding. Hold the wand 6-12 inches away—closer for stubborn stains, farther for delicate materials—at a 30-45-degree angle to spread pressure and avoid direct impact.
Use smooth, overlapping sweeps, working from the stain’s edges inward to contain it. For graffiti or oil, watch for milky runoff, indicating successful emulsification. If stains persist, pause, reapply detergent, and wash again. A surface cleaner attachment speeds up flat areas like driveways, ensuring even results. This methodical approach maximizes stain removal while preserving the surface’s integrity.

Step 6: Rinse Thoroughly and Inspect
Rinsing and inspecting ensure all detergent, stain residue, and debris are removed, preventing re-staining or surface issues. Incomplete rinsing can leave soap films that attract dirt, undermining your efforts.
Switch to a low-pressure rinse (1,200-1,500 PSI) with a 40-degree nozzle, flushing from top to bottom or one end to the other. Direct runoff into a tarp or vacuum system, especially for oil or paint, to meet environmental regulations. Inspect the wet surface for residual stains—concrete should lighten uniformly, wood should show no green tint. If faint marks remain, spot-treat and re-wash.
Allow drying (24-48 hours, weather-dependent) and reassess—some stains, like rust, may leave shadows only visible dry. Thorough rinsing and inspection confirm a clean, polished finish, ready for sealing or use.
Step 7: Prevent Future Stains with Maintenance
Preventing stain recurrence preserves your power washing results and reduces future effort. Maintenance addresses the conditions that foster stains, keeping surfaces pristine.
Seal surfaces post-washing: apply a siloxane-based sealer to concrete to repel oil and water, or a wood sealant (e.g., Thompson’s WaterSeal) to block algae. Brush or roll evenly, allowing 24-48 hours to cure. For driveways, use drip pans under vehicles to catch oil leaks, and clean spills immediately with absorbent materials (e.g., cat litter) and spot washing.
Schedule regular power washing—biannually or after wet seasons—to catch algae or dirt early. Improve drainage to reduce standing water, a magnet for organic growth. These steps minimize stain buildup, maintaining a clean, durable surface with less intensive cleaning over time.
Conclusion
Power washing is a proven method for removing stubborn stains, from oil to graffiti, when approached with care and strategy. By identifying stains and surfaces, gathering quality equipment, preparing thoroughly, pre-treating with detergents, washing precisely, rinsing well, and maintaining proactively, you achieve a spotless, professional finish. This process not only restores aesthetics but also protects surfaces from damage, enhancing property value.
With the right tools and techniques, stubborn stains don’t stand a chance. Follow this guide, invest in preparation, and enjoy surfaces that shine—searchable under “power washing stain removal” or “clean driveway tips” for lasting appeal.